Liveness and Readiness Probes

You (probably) need liveness and readiness probes
One of the most common questions I get as a consultant is, “What is the difference between a liveness and a readiness probe?” The next most frequent question is, “Which one does my application need?”
Anyone who has tried Duck Duck Go-ing these questions knows that they are difficult to answer using an internet search. In this article, I hope to help you answer these questions for yourself. I will share my opinion about the best way to use liveness and readiness probes in applications deployed to Red Hat OpenShift. I’m not offering a hard prescription but rather a general framework that you can use to make your own architectural decisions. Each application is different, and these differences might require adapting the “rules” you learn here.
To help make the abstract more concrete, I offer four generic example applications. For each one, we’ll explore whether and how to configure liveness and readiness probes. Before we dive into the examples, let’s look more closely at the two different probe types.
Note: Kubernetes has recently adopted a new “startup” probe available in OpenShift 4.5 clusters. The startup probe does not replace liveness and readiness probes. You’ll quickly understand the startup probe once you understand liveness and readiness probes. I won’t cover startup probes here.
Liveness and readiness probes
Liveness and readiness are the two main probe types available in OpenShift. They have similar configuration APIs but different meanings to the platform.
When a liveness probe fails, it signals to OpenShift that the probed container is dead and should be restarted. When a readiness probe fails, it indicates to OpenShift that the container being probed is not ready to receive incoming network traffic. The application might become ready in the future, but it should not receive traffic now.
If the liveness probe succeeds while the readiness probe fails, OpenShift knows that the container is not ready to receive network traffic but is working to become ready. For example, this is common in applications that take time to initialize or to handle long-running calls synchronously. (Handling long-running calls synchronously is an anti-pattern, but unfortunately, we are stuck with it in some legacy applications.)
Next, we’ll zoom in on the specific uses for each of these probe types. Once we understand the probe types in isolation, I’ll show you examples of how they work together in OpenShift.
What are liveness probes for?
A liveness probe sends a signal to OpenShift that the container is either alive (passing) or dead (failing). If the container is alive, then OpenShift does nothing because the current state is good. If the container is dead, then OpenShift attempts to heal the application by restarting it.
The name liveness probe expresses a semantic meaning. In effect, the probe answers the true-or-false question: “Is this container alive?”
What if I don’t specify a liveness probe?
If you don’t specify a liveness probe, then OpenShift will decide whether to restart your container based on the status of the container’s PID 1 process. The PID 1 process is the parent process of all other processes that run inside the container. Because each container begins life with its own process namespace, the first process in the container will assume the special duties of PID 1.
If the PID 1 process exits and no liveness probe is defined, OpenShift assumes (usually safely) that the container has died. Restarting the process is the only application-agnostic, universally effective corrective action. As long as PID 1 is alive, regardless of whether any child processes are running, OpenShift will leave the container running.
If your application is a single process, and that process is PID 1, then this default behavior might be precisely what you want—meaning that you don’t need a liveness probe. If you are using an init tool such as tini or dumb-init, then it might not be what you want. The decision of whether to define your own liveness probe instead of using the default behavior is specific to each application
What are readiness probes for?
OpenShift services use readiness probes to know whether the container being probed is ready to start receiving network traffic. If your container enters a state where it is still alive but cannot handle incoming network traffic (a common scenario during startup), you want the readiness probe to fail. That way, OpenShift will not send network traffic to a container that isn’t ready for it. If OpenShift did prematurely send network traffic to the container, it could cause the load balancer (or router) to return a 502 error to the client and terminate the request; either that or the client would get a “connection refused” error message.
Like the liveness probe, the name of the readiness probe conveys a semantic meaning. In effect, this probe answers the true-or-false question: “Is this container ready to receive network traffic?”
What if I don’t specify a readiness probe?
If you don’t specify a readiness probe, OpenShift will assume that the container is ready to receive traffic as soon as PID 1 has started. This is never what you want.
Assuming readiness without checking for it will cause errors (such as 502s from the OpenShift router) anytime a new container starts up, such as on scaling events or deployments. Without a readiness probe, you will get bursts of errors every time you deploy, as the old containers terminate and the new ones start up. If you are using autoscaling, then depending on the metric threshold you set, new instances could be started and stopped at any time, especially during times of fluctuating load. As the application scales up or down, you will get bursts of errors, as containers that are not quite ready to receive network traffic are included in the load-balancer distribution.
You can easily fix these problems by specifying a readiness probe. The probe gives OpenShift a way to ask your container if it is ready to receive traffic.
Next, let’s look at specific examples that will help us understand the difference between the two types of probes and the importance of getting them right.
Note: The fact that there are different types of probes with identical APIs is a frequent source of confusion. But the existence of two or more probe types is good design: It makes OpenShift flexible for various application types. The availability of both liveness and readiness probes is critical to OpenShift’s reputation for being a Container-as-a-Service that accommodates a wide range of applications.
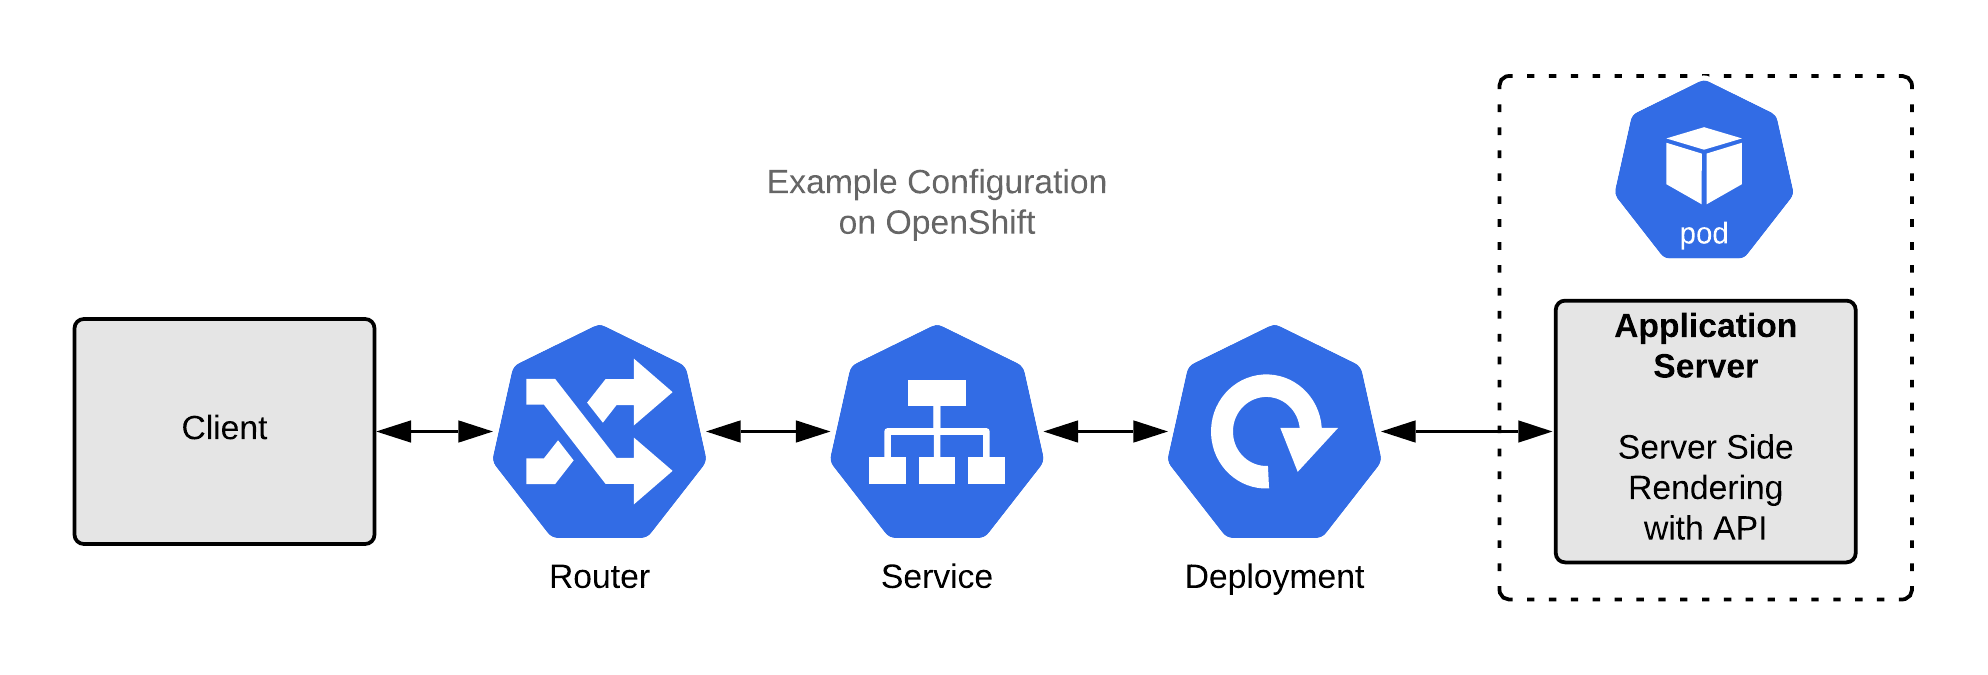
Example 1: A static file server (Nginx)
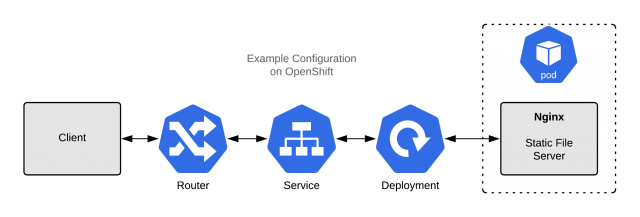
The example application shown in Figure 1 is a simple static file server that uses Nginx to serve files. Startup time is low, and it is straightforward to check whether the server is handling traffic: You can request a known page and verify that a 200 HTTP response is returned.
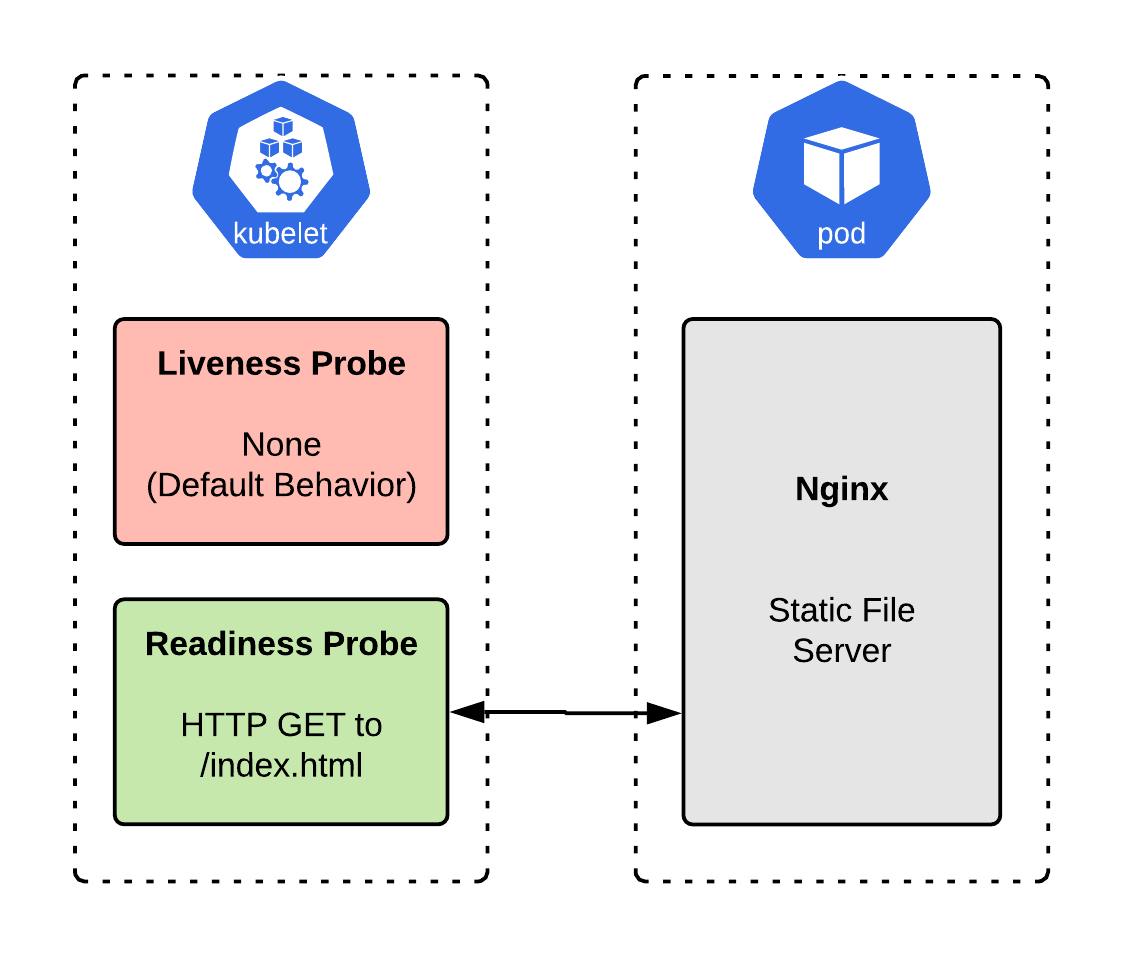
Do we need a liveness probe?
The application starts up quickly and will exit if it encounters an error that prevents it from serving pages. So, in this case, we do not need a liveness probe. An exited Nginx process means that the application has died and needs to be restarted. (Note that issues like SELinux problems or misconfigured filesystem permissions will not cause Nginx to exit, but a restart wouldn’t fix those anyway.)
Do we need a readiness probe?
Nginx is handling incoming network traffic, so we do need a readiness probe. Anytime you are handling network traffic, you need a readiness probe to avoid encountering container startup errors, such as deployment and autoscaling. Nginx starts up quickly, so you might get lucky, but we still want to avoid forwarding traffic until the container is ready, as per best practice.
Updating the server with a readiness probe
We will need to make specific changes for each example, but first, here is the top part of the Deployment. We’ll change this file as we go, but the top part will remain the same. For future examples, we will only need to modify the template spec.
 1apiVersion: apps/v1
 2kind: Deployment
 3metadata:
 4  labels:
 5    app: application-nginx
 6  name: application-nginx
 7spec:
 8  replicas: 1
 9  selector:
10    matchLabels:
11      app: application-nginx
12  template:
13    metadata:
14      labels:
15        app: application-nginx
16    spec:
17      # Will appear below as it changes
Here is the probe configuration for the first example:
 1    spec:
 2      containers:
 3      - image: quay.io/<username>/nginx:latest
 4        name: application-nginx
 5        imagePullPolicy: Always
 6        ports:
 7        - containerPort: 8443
 8          protocol: TCP
 9        readinessProbe:
10          httpGet:
11            scheme: HTTPS
12            path: /index.html
13            port: 8443
14          initialDelaySeconds: 10
15          periodSeconds: 5
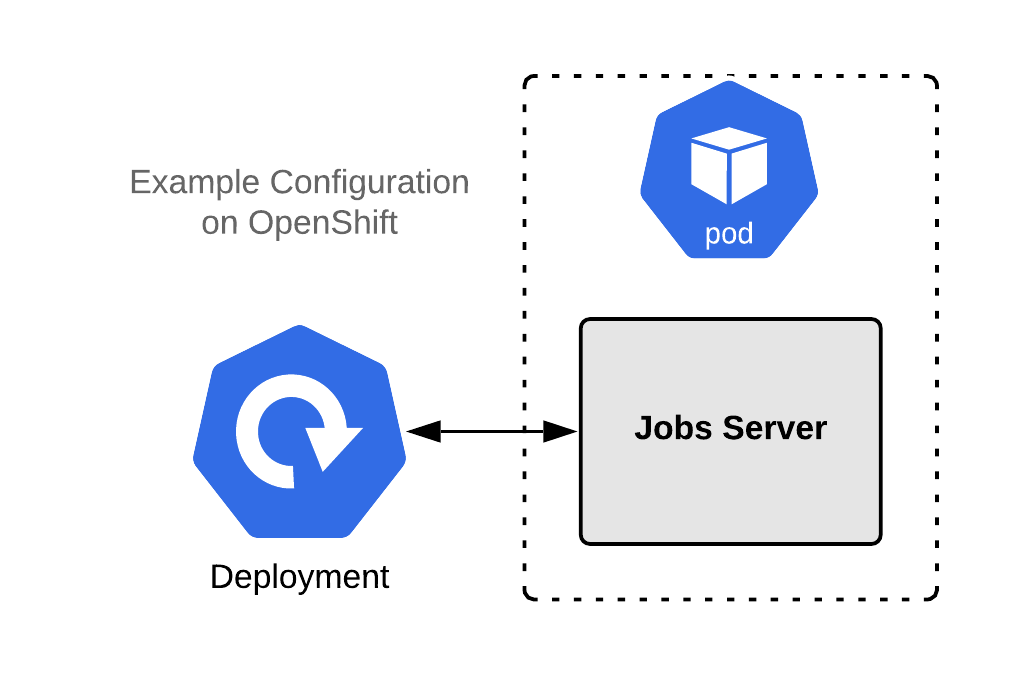
Example 2: A jobs server (no REST API)
Many applications have an HTTP web component, as well as an asynchronous “jobs” component. Jobs do not need a readiness check because they don’t handle incoming network traffic. However, they do need a liveness check. If the process running the jobs dies, then the container is worthless, and jobs will accumulate in the queue. Typically, restarting the container is the correct thing to do, so a liveness probe is ideal here.
The example application in Figure 3 is a simple job server that pops and runs tasks from a queue. It does not directly handle incoming network traffic.
 I’ve already mentioned that this type of application benefits from a liveness probe, but it doesn’t hurt to go through the process of inquiry anyway.
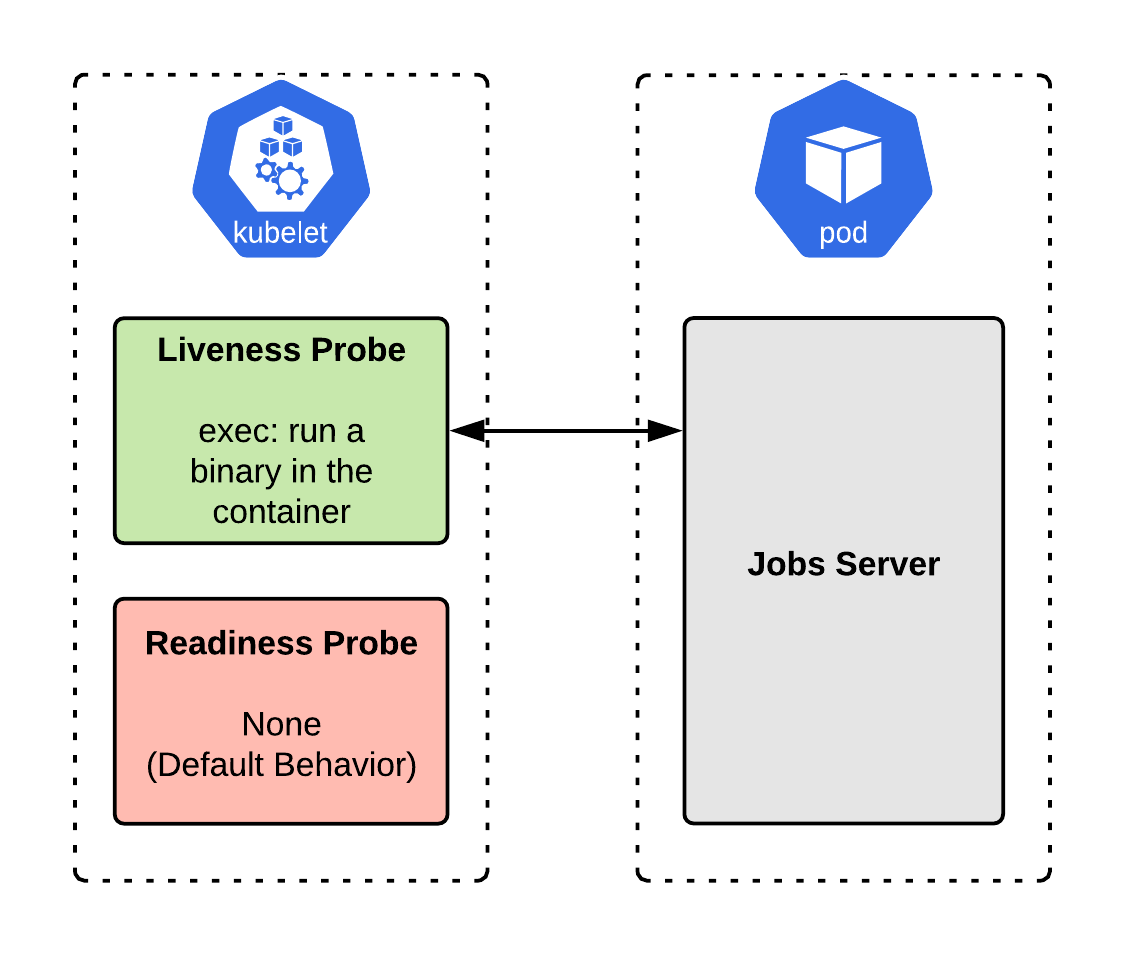
Do we need a liveness probe?
When our job is running properly, it will be a living process. If the jobs container stops working, it is most likely a crash, unhandled exception, or something similar. How we set up the probe, in this case, depends on whether our job process is running as PID 1.
If our job process is PID 1, it will exit when it encounters an exception. With no liveness probe specified, OpenShift will see the exit of PID 1 as a death and will restart the container. For a trivial jobs server, a restart might not be what we want.
In real life, however, things can sometimes be more complicated. For example, if our jobs process encounters a deadlock, it might still appear to be alive because the process is running, but it’s clearly in a failed state and should be restarted.
To help detect deadlock, our application will write the current system time in milliseconds to a file at /tmp/jobs.update whenever it processes a job. This time will then be checked with a shell command (via the exec liveness probe) to ensure that the current job has not been running for longer than a given timeout value. The application can then check itself for liveness by executing /usr/bin/my-application-jobs --alive.
We can set up a liveness probe as follows (again, I am omitting the first part of the Deployment YAML file, which I showed previously):
 1    spec:
 2      containers:
 3      - image: quay.io/<username>/my-application-jobs:latest
 4        name: my-application-jobs
 5        imagePullPolicy: Always
 6        livenessProbe:
 7          exec:
 8            command:
 9            - /bin/sh
10            - -c
11            - "/usr/bin/my-application-jobs --alive"
12          initialDelaySeconds: 10
13          periodSeconds: 5
Do we need a readiness probe?
In this case, there is no need for a readiness probe. Remember that a readiness probe sends a signal to OpenShift that the container is ready to handle network traffic and so can be added to the load balancer. Because this application does not handle incoming network traffic, it doesn’t need to be checked for readiness. We can leave off the readiness probe. Figure 4 shows the jobs server implementation with a liveness probe configured.
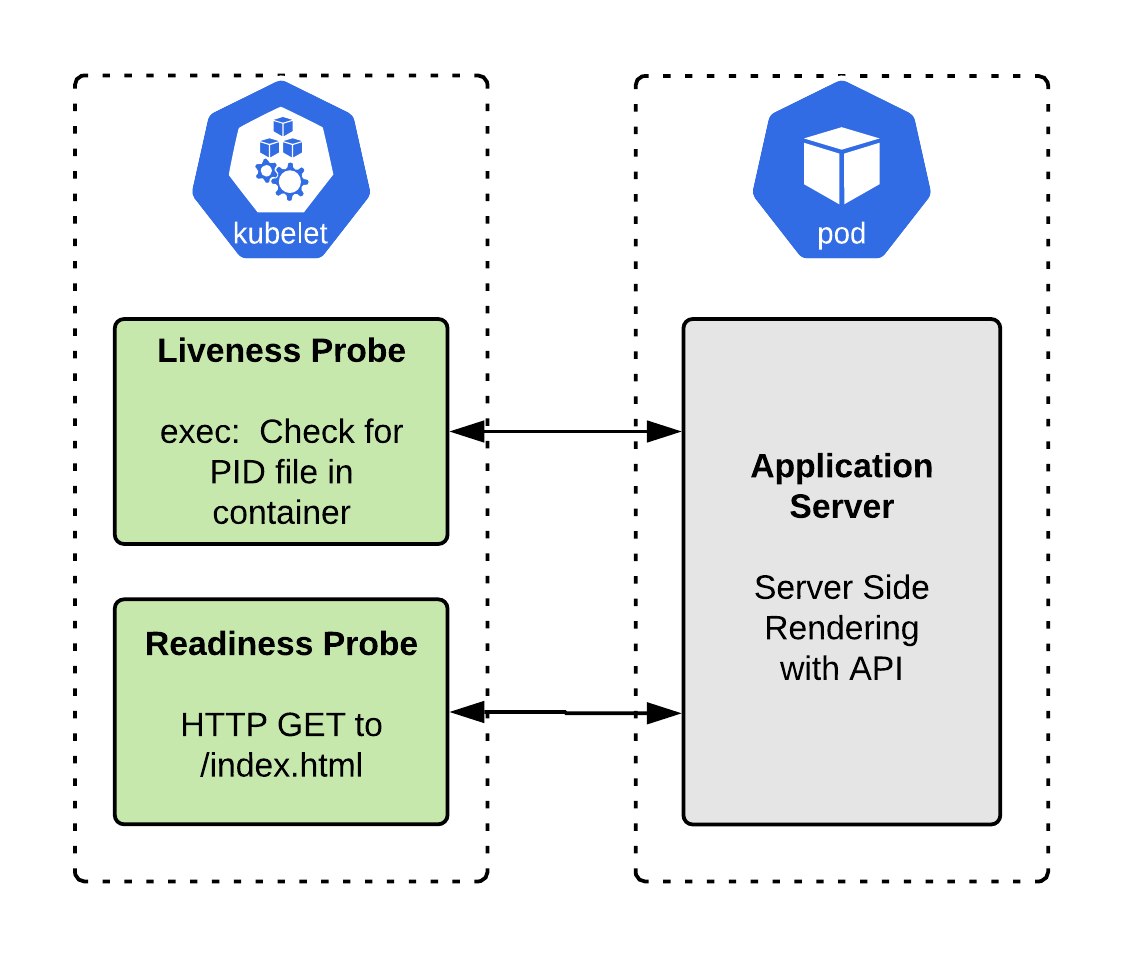
Example 3: A server-side rendered application with an API
 This example is a standard server-side rendered (SSR) application: It renders HTML pages on the server, on-demand, and sends them to the client. We could build an application like this using Spring Boot, PHP, Ruby on Rails, Django, Node.js, or any similar framework.
Do we need a liveness probe?
If the application starts up in a few seconds or less, then a liveness probe is probably unnecessary. If it takes more than a few seconds, we should put in a liveness probe to ensure that the container initializes without error rather than crashing.
In this case, we could use an exec type of liveness probe, which runs a shell command to ensure that things are still running. This command will vary depending on the application. For example, if the app writes a PID file, we could check that it is still alive:
1        livenessProbe:
2          exec:
3            command:
4            - /bin/sh
5            - -c
6            - "[ -f /run/my-application-web.pid ] && ps -A | grep my-application-web"
7          initialDelaySeconds: 10
8          periodSeconds: 5
Do we need a readiness probe?
Because this application handles incoming network requests, we will definitely want a readiness probe. Without a readiness probe, OpenShift will immediately send network traffic to our container after starting it, whether the application is ready or not. If the container starts dropping requests but hasn’t crashed, it will continue to receive traffic indefinitely, which is certainly not what we want.
We want OpenShift to remove the container from the load balancer if it ceases to return healthy responses. We can use a readiness probe like this one to signal to OpenShift that the container is ready to receive network traffic:
1        readinessProbe:
2          httpGet:
3            scheme: HTTPS
4            path: /healthz
5            port: 8443
6          initialDelaySeconds: 10
7          periodSeconds: 5
For easy reference, here’s the complete YAML for this example app:
 1apiVersion: apps/v1
 2kind: Deployment
 3metadata:
 4  labels:
 5    app: backend-service
 6  name: backend-service
 7spec:
 8  replicas: 1
 9  selector:
10    matchLabels:
11      app: backend-service
12  template:
13    metadata:
14      labels:
15        app: backend-service
16    spec:
17      containers:
18      - image: quay.io/<username>/backend-service:latest
19        name: backend-service
20        imagePullPolicy: Always
21        ports:
22        - containerPort: 8443
23          protocol: TCP
24        readinessProbe:
25          httpGet:
26            scheme: HTTPS
27            path: /healthz
28            port: 8443
29          initialDelaySeconds: 10
30          periodSeconds: 5
Figure 6 shows a diagram of the SSR application with both liveness and readiness probes configured.
Example 4: Putting it all together
In a complete, complex, and realistic application, you might have elements of all three of the previous examples. Taking them individually is useful for considering probes, but it’s also helpful to see them working together to serve a large application with millions of requests. This final example consolidates the other three.
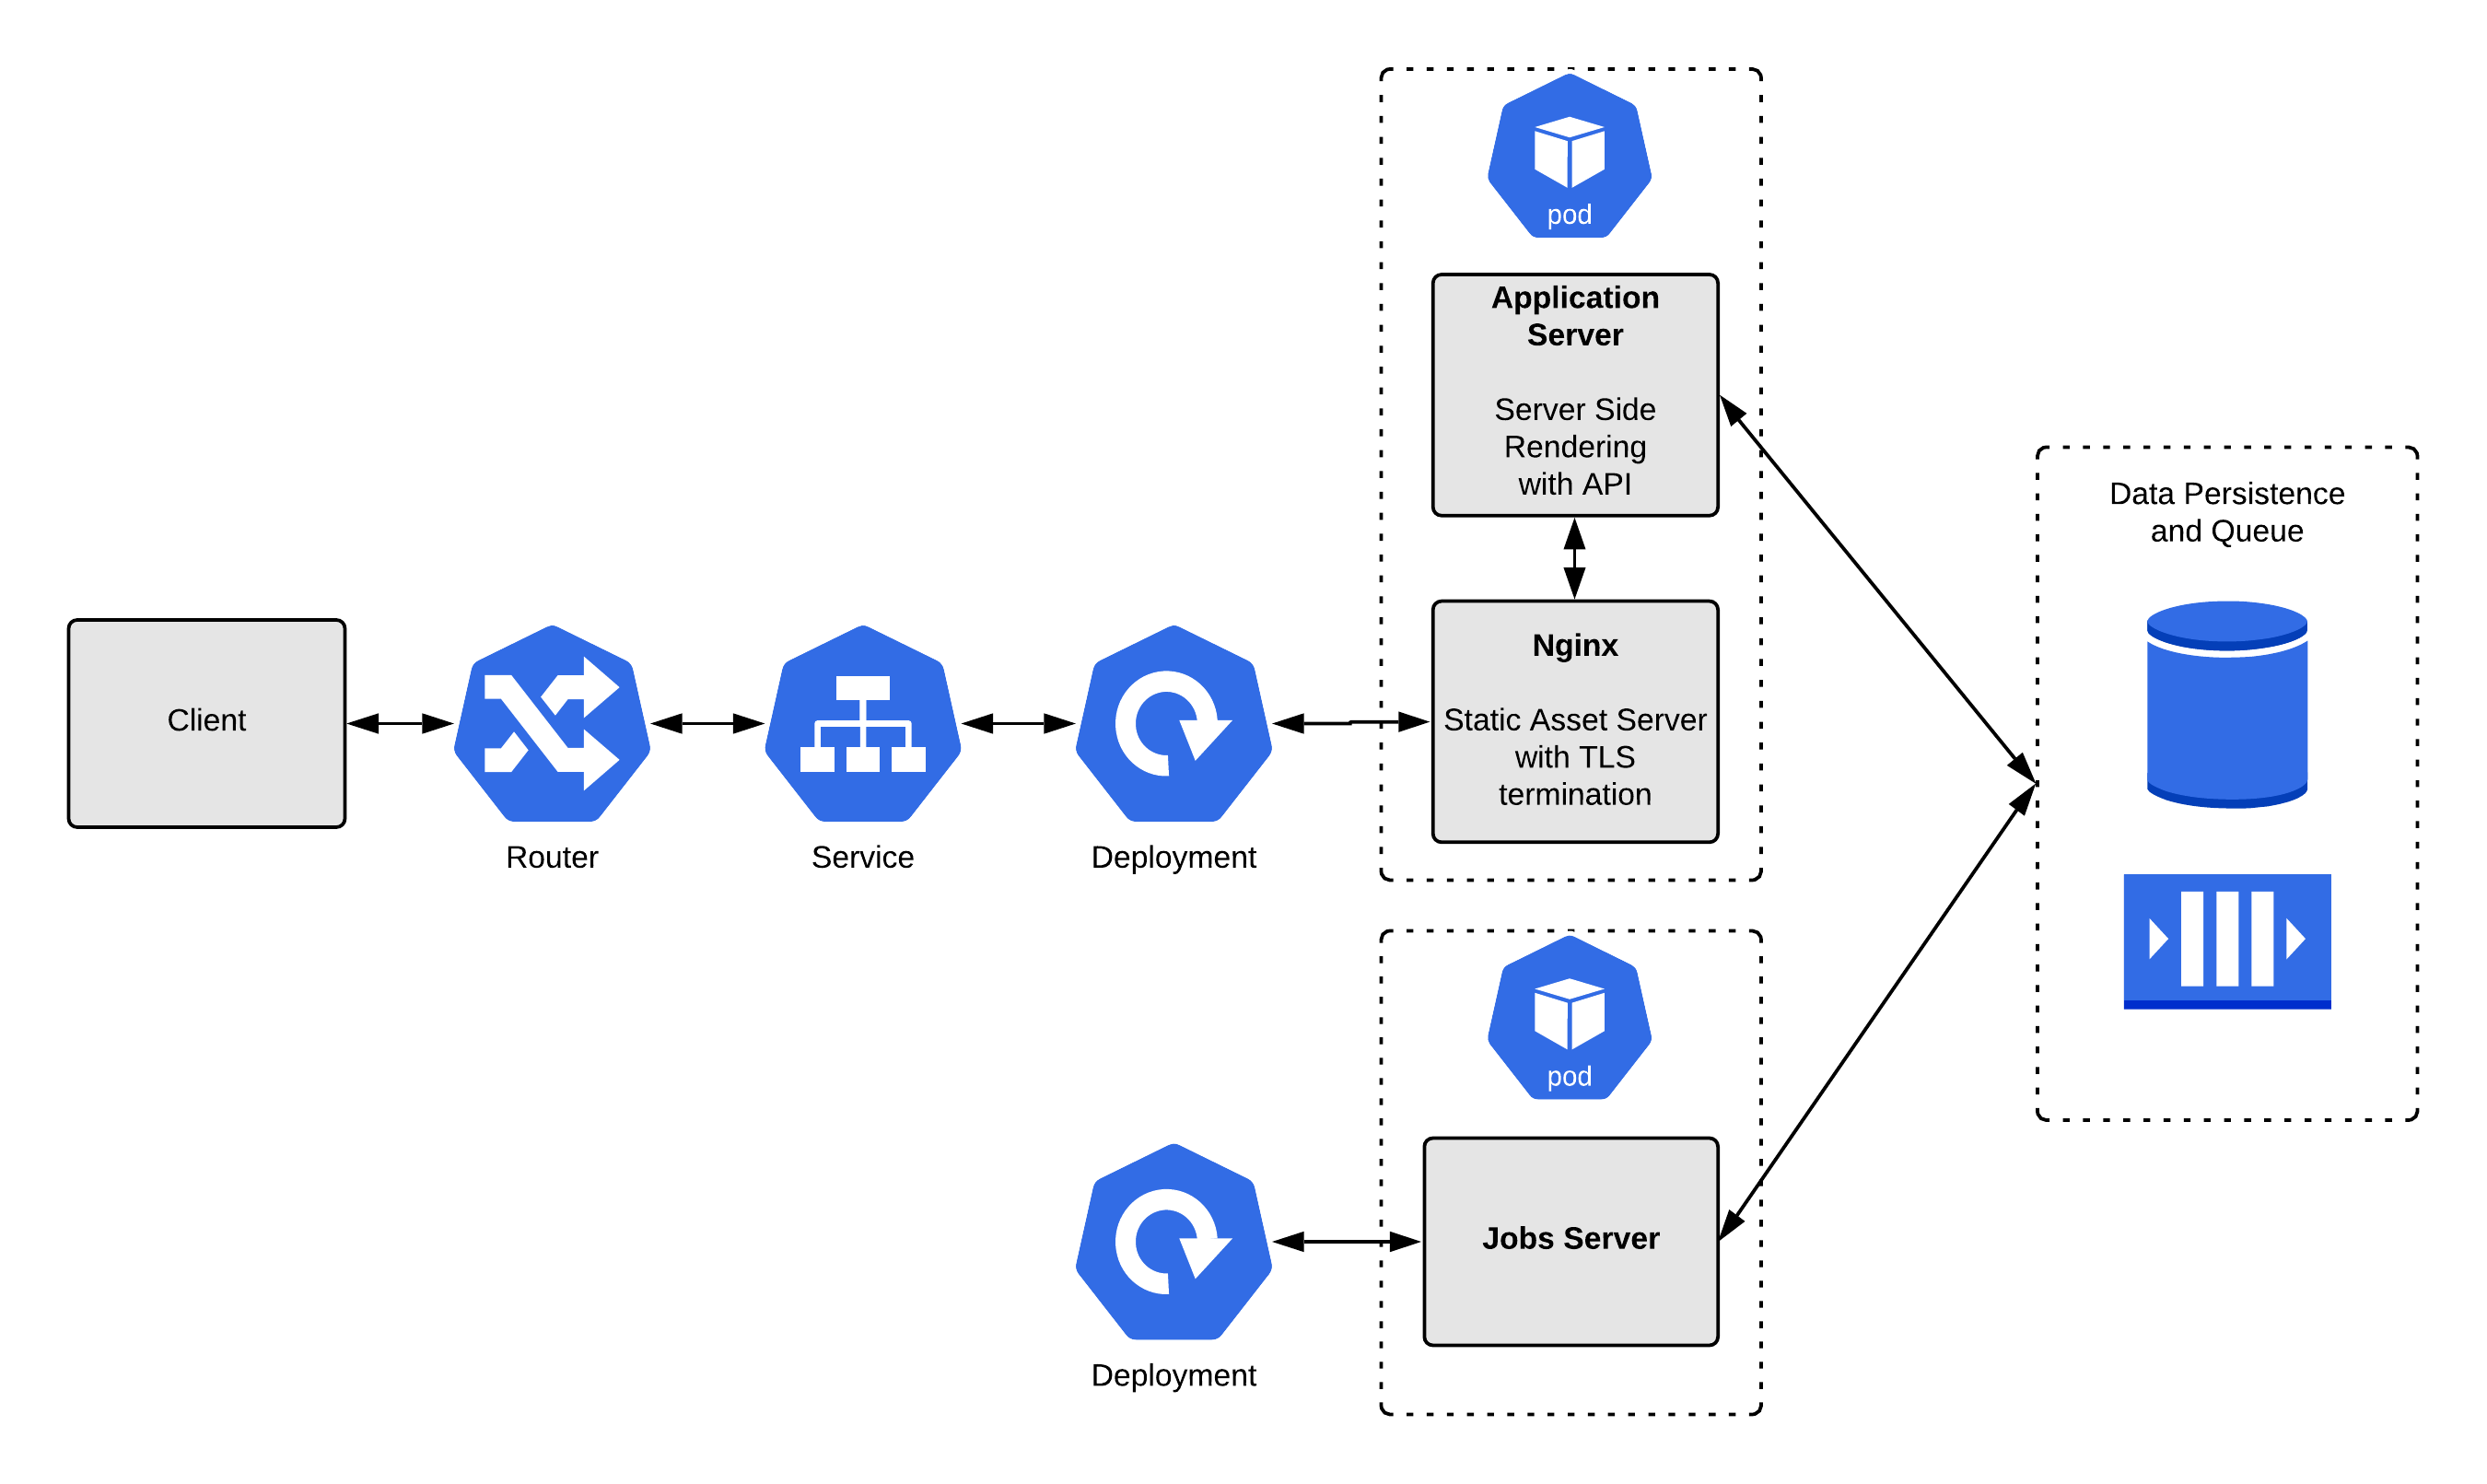 This example application consists of three container pieces:
- The application server: This server provides a REST API and performs server-side rendering for some pages. This setup is widespread, as applications that begin as simple server-side renderers are later enhanced to provide REST API endpoints.
- A Nginx static file server: This container has two jobs: It renders static assets for the application (such as JavaScript and CSS assets). It also provides TLS (Transport Layer Security) termination for the application server by acting as a reverse proxy for certain paths. This is also a widespread setup.
- A jobs server: This container does not handle incoming network traffic on its own but rather processes jobs. The application server pushes each job to a queue, where the jobs server picks it up and executes it. The jobs server frees up the application server to focus on processing network requests rather than running long threads.
The example app also includes a couple of data persistence services:
- A relational database: The relational database is the source of state for our application. Nearly every application needs a database of some kind, and relational databases are the majority choice.
- A queue: The queue provides a first-in, first-out (FIFO) way for the application server to communicate tasks to the jobs server. The app server will always push, and the jobs server will pop.
Our containers are spread into two pods:
- The first pod consists of our application server and the Nginx TLS terminator or static file server. This simplifies the application server’s management by allowing it to communicate directly over HTTP. By sharing a pod, these containers can communicate securely and directly with minimal latency. They also can access a shared volume space. The containers need to be scaled together and treated as a single unit, so a pod is the perfect unit of organization.
- The second pod consists of the jobs server. This server needs to scale independently of the other containers, so it must be in its own pod. Because all state is held in the database and queue, the jobs server can easily access the resources that it needs.
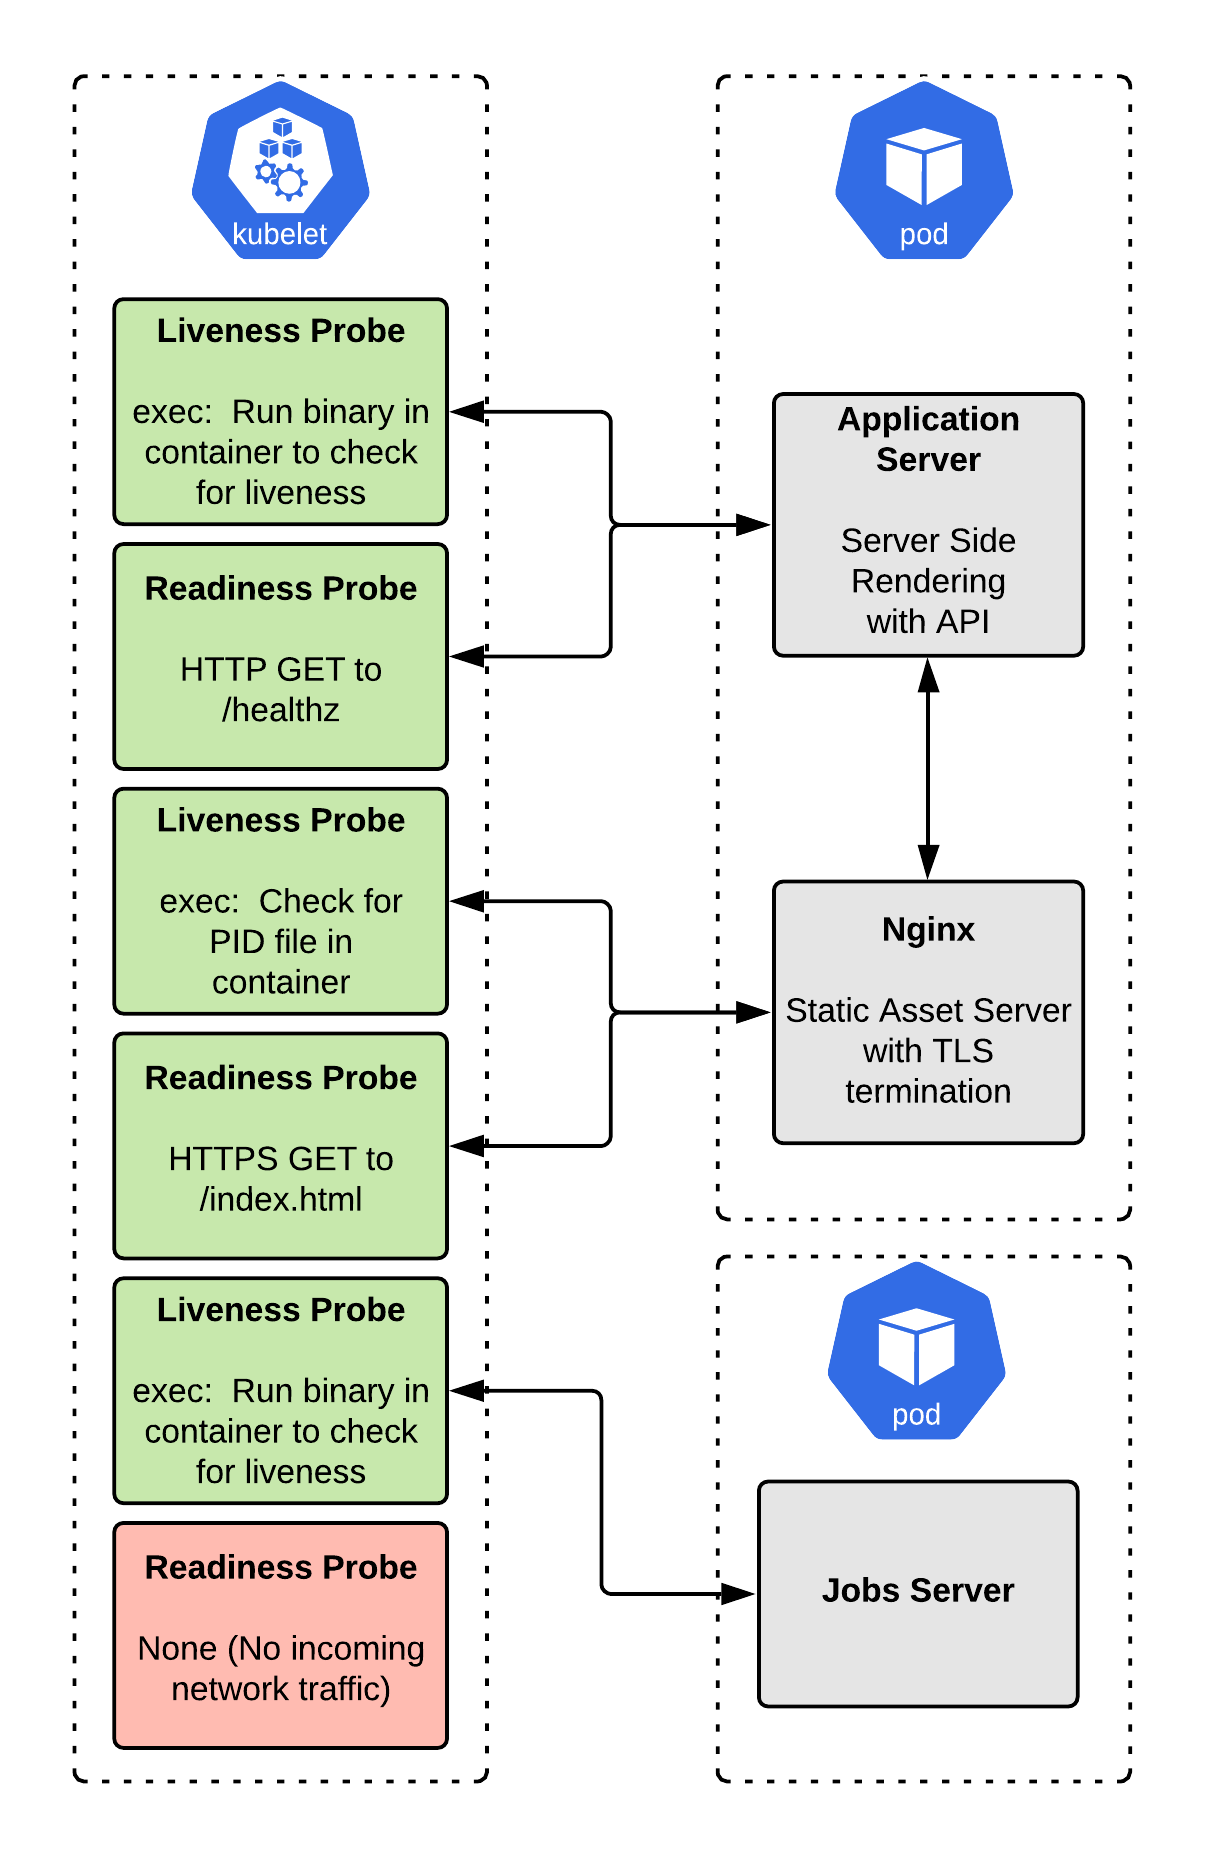
If you followed the previous examples, the solution here should not be surprising. To integrate, we switch the application server to use HTTP and port 8080 instead of HTTPS and 8443 for the readiness probe. We also add a liveness probe to the application server to cover us if the application server doesn’t exit on error. This way, our container will be restarted by the Kubelet once it is “dead”:
 1# Pod One - Application Server and Nginx
 2apiVersion: apps/v1
 3kind: Deployment
 4metadata:
 5  labels:
 6    app: my-application-web
 7  name: my-application-web
 8spec:
 9  replicas: 1
10  selector:
11    matchLabels:
12      app: my-application-web
13  template:
14    metadata:
15      labels:
16        app: my-application-web
17    spec:
18      containers:
19      - image: quay.io/<username>/my-application-nginx:latest
20        name: my-application-nginx
21        imagePullPolicy: Always
22        ports:
23        - containerPort: 8443
24          protocol: TCP
25        livenessProbe:
26          exec:
27            command:
28            - /bin/sh
29            - -c
30            - "[ -f /run/nginx.pid ] && ps -A | grep nginx"
31          initialDelaySeconds: 10
32          periodSeconds: 5
33        readinessProbe:
34          httpGet:
35            scheme: HTTPS
36            path: /index.html
37            port: 8443
38          initialDelaySeconds: 10
39          periodSeconds: 5
40      - image: quay.io/<username>/my-application-app-server:latest
41        name: my-application-app-server
42        imagePullPolicy: Always
43        ports:
44        - containerPort: 8080
45          protocol: TCP
46        livenessProbe:
47          exec:
48            command:
49            - /bin/sh
50            - -c
51            - "/usr/bin/my-application-web --alive"
52          initialDelaySeconds: 10
53          periodSeconds: 5
54        readinessProbe:
55          httpGet:
56            scheme: HTTP
57            path: /healthz
58            port: 8080
59          initialDelaySeconds: 10
60          periodSeconds: 5
61
62# Pod Two - Jobs Server
63apiVersion: apps/v1
64kind: Deployment
65metadata:
66  labels:
67    app: my-application-jobs
68  name: my-application-jobs
69spec:
70  replicas: 1
71  selector:
72    matchLabels:
73      app: my-application-jobs
74  template:
75    metadata:
76      labels:
77        app: my-application-jobs
78    spec:
79      containers:
80      - image: quay.io/<username>/my-application-jobs:latest
81        name: my-application-jobs
82        imagePullPolicy: Always
83        livenessProbe:
84          exec:
85            command:
86            - /bin/sh
87            - -c
88            - "/usr/bin/my-application-jobs --alive"
89          initialDelaySeconds: 10
90          periodSeconds: 5
What about identical liveness and a readiness probes?
While this pattern is overused, in my opinion, there are cases where it makes sense. If the application starts experiencing failed HTTP calls, and will likely never come back to ready without a restart, then you probably want OpenShift to restart the pod. It would be better if your application recovered on its own, but that is sometimes not practical in the real world.
If you have an HTTP endpoint that is a good canary, you could set up a liveness probe and a readiness probe to hit this same endpoint. Using the same endpoint ensures that your pod will restart if it fails to return success on that endpoint.
Final thoughts
Liveness and readiness probes send different signals to OpenShift. Each has a specific meaning, and they are not interchangeable. A failed liveness probe tells OpenShift to restart the container. A failed readiness probe tells OpenShift to hold off on sending traffic to that container.
There is no one-size-fits-all prescription for probes because the “correct” choice will vary depending on how the application is written. An application that can self-heal will need a different probe setup than one that simply crashes and dies.
When deciding on the correct probes for an application, I consider the probe’s semantic meaning in conjunction with the application’s behavior. Knowing that failing liveness probes will restart the container and failing readiness probes will remove it from the load balancer. It is usually not complicated to determine which probes the application needs.
We have considered realistic examples, but you might see considerably more complexity in real systems. For instance, in a service-oriented architecture (SOA), a service might depend on another service to handle requests. If the downstream service is not ready, should the readiness probe for the upstream be healthy or not? The answer is dependent on the application. You will need to do a cost/benefit analysis to determine whether the added complexity is worth it.
While probes are conceptually very simple, they can be complex in practice. The best way to narrow it down is to iterate! Do performance testing and chaos testing to determine how your configuration behaves and improve as you go. We rarely get it right the first time.